Naxxramas 10 men guide
Page 1 of 1

Naxxramas 10 men guide
![]() Pinwinnie Thu Jan 15, 2009 6:14 pm
Pinwinnie Thu Jan 15, 2009 6:14 pm

A short overview of the tactics for Naxxramas (10 men instance) can be read in this guide.
I suggest everyone starts reading tactics for the instructor (DK wing), Anub'Rehkan, grand window Faerlina and Maexxna (Spider wing).
Last edited by Pinwinnie on Sun Jan 18, 2009 6:58 pm; edited 1 time in total

Pinwinnie- Posts : 26
Join date : 2009-01-15
Age : 44
Location : The Netherlands
Re: Naxxramas 10 men guide
![]() Pinwinnie Sun Jan 18, 2009 6:55 pm
Pinwinnie Sun Jan 18, 2009 6:55 pm
Arachnid Quarter (summary of the information provided by wowwiki)
A web-covered wing of Spiders and Cultists of the Cult of the Damned. Three bosses. This is the entry level quarter, usually the first one targeted by guilds to gear up their players. Bring Poison Cleanse abilities and consistent DPS.
Bosses:
Anub'Rekhan
Impale:
This is an area-of-effect ability that targets a random player and hits everyone in a straight line between Anub'Rekhan and the player, causing 4813 to 6187 physical damage and launching the affected players high in the air, who then suffer 50% fall damage when they hit the ground.
Locust Swarm:
Every 70-120 seconds, Anub'Rekhan slows to 60% normal run speed and casts a spell that causes AoE damage in a 30-yard radius around him that centers around him as he moves. Remaining in the radius of effect causes a DoT debuff of 875 to 1125 nature damage every 2 seconds that stacks repeatedly, and which silences those afflicted. When he casts this spell, another Crypt Guard also spawns at his initial engage point. Lasts 16 seconds.
Notes:The Locust Swarm attack has an approximately 90-second cooldown, but the first cast may occur between 80 seconds and 2 minutes. Its silencing ability is unlike a normal silence, as it prevents the use of all abilities, even auto-attack. This means that the main tank cannot use Shield Wall or Last Stand to save himself if he gets stacked too high. Items, however, may still be used.
Aspect of the Pack can be used to get out of the Locust Swarm range but requires timing and coordination from the Main Tank and Hunter. Unholy Aura will also work if the Death knight stands a little further ahead of the kiting path and runs with the Main Tank to the initial tanking position. If you are late on your kiting and start stacking up the debuff, drink a swiftness potion.
Summon Corpse Scarabs:
Whenever there is a corpse in the room (either a player or a Crypt Guard) Anub'Rekhan can spawn corpse scarabs from it. This is not on a set timer. Ten will be spawned from a Crypt Guard and Five from a player. They spawn with threat on random players and will spread out and attack random targets.
Crypt Guards
One of these adds spawns after every Locust Swarm. In addition, one spawns approximately 20 seconds after Anub'Rekhan is pulled. They have around 234,000 health. They have a cleave, a stacking acid spit DoT that ticks for 500 a stack, and a low-hp frenzy that increases damage by 50% and attack speed by 60%.
Strategy
The kiting strategy can be difficult to master for a group with poor coordination. Ranged DPS might get caught in the swarm trying to kill the adds when the tank kites, and cause everything to go wrong. An alternative strategy is to not kite at all, but have the tank stay put and take the full damage of the swarm while the healers spam heals on him. This is entirely possible and will make the fight more of a tank-and-spank with extra healing on the swarm. Death Knights are good tanks for this tactic because they can time their damage reduction ability with the swarm and take less damage. Tanks simply have to make sure that they use their damage reduction ability before the swarm because it silences them.
Once you enter the area where Anub'Rekhan is located, have a hunter misdirect (if available) onto the main tank and pull the boss to the actual entrance doorway area and tank it there while the rest of the raid runs forward and splits into a semi-circle roughly in the center of the room. Have your secondary tank behind everyone, where the adds spawn. All ranged DPS should spread around to avoid the impale. The offtank can add some DPS or even some off-healing to the party, but be ready to pick up the adds that spawn in the back, as they can easily one-shot a cloth wearer. Once the add spawns and the offtank picks it up, all the DPS has to do is simply turn around and burn it down. Do the same when the Corpse Scarabs spawn. This tactic is meant to reduce any kind of confusion in the kiting method, so separating the boss and the add makes the fight really simple. Remember that this method only really work if your healers keep the main tank topped up, especially during the locust swarm. Due to the massive damage that tanks take from the end of a Locust Swarm, any off-healers—such as shamans or paladins—should assist in keeping the main tank alive during this phase.
Note: The adds do not hit the offtank really hard, but with a low-DPS group the damage debuff can stack and be really painful. A nice way to prevent extra damage is to stun, as this prevents them from casting the debuffs at all; these debuffs last for 10 seconds and are reapplied every 2 seconds, so if you can cast a stun (such as Hammer of Justice) when your tank has 8 seconds left on the debuff, and add one more at 2 seconds, the debuff will start to 0 again, largely reducing the damage taken. The goal is to have a chain stun ready when the elite is around 50% health to reduce the overall damage taken. The adds are undead, so the paladin undead AoE stun can work for 1 sec.
Extra Note: The small adds that spawn from the corpse are really fast and can get out of a consecrate.
Grand Widow Faerlina
Poison Bolt Volley:
This will hit the three closest players to Grand Widow Faerlina, used every on average every 12 to 15 seconds, but sometimes with as little as seven or eight seconds between casts. Deals 2625 to 3375 Nature damage and applies a dot that does 1480 to 1720 Nature damage every 2 seconds for eight seconds. Dispellable. Widow's Embrace prevents the use of this ability for 30 seconds.
Rain of Fire:
Random Rains of Fire will be cast on players throughout the fight, at intervals of anywhere from six to eighteen seconds. 1750 to 2750 Fire damage every two seconds. Rain of Fire lasts six seconds. 8 yard radius.
Frenzy:
This will be used approximately every 60–80 seconds. It will increase Grand Widow Faerlina's physical damage by 150%, her melee haste by 50% and her size by 50%. During it she will hit the tank for upwards of 15,000 damage. Widow's Embrace dispels and prevents the use of this ability for 60 seconds.
NOTE: Faerlina's Frenzy cannot be removed by hunters' Tranquilizing Shot.
NOTE: You must kill the worshipper AFTER she enrages if you want to stop her for the full 60 seconds. If you sacrifice the Worshipper before the enrage, it will merely delay the enrage for 30 seconds.
Worshippers
There are 4 "Naxxramas Worshipper" NPCs at the start of the fight.
They will be off-tanked for most of the fight, and eventually sacrificed to Faerlina. When killed near Faerlina, they will remove and prevent Frenzy as well as silence Faerlina's nature school for 30 seconds. This fight cannot last more than 4:45 or so because there will be no way to prevent the Frenzy if all the adds are dead. It should be noted that in 10-man, the Worshippers are immune to Mind Control, and must be DPSed down. This can be tricky if your off-tank is overzealous and brings one in particular down too fast. Predetermine a kill order for the worshippers (raid marks work well), and bring one down to ~5%, then kill it once Faerlina enrages.
Strategy
You will need two tanks. One tank will pick up the worshippers and offtank them right under the stairs on the left side. Any tank class is good at tanking them, as they don't deal high loads of damage. The main tank will pick up Faerlina after the OT pulls the rest and drag her to the middle of the room where everyone will spread out around her. Every DPS should focus ONLY in Faerlina, ignoring the four adds till the enrage phase is near.
The off-tank will pick all four adds, and start DPSing one of them: the one who must be killed in order to stop Faerlina's enrage.
When the frenzy is about to come off cooldown (10 secs or so) every DPS should stop all DPS and switch target to the worshipper marked to kill. Do not start attacking it, just target it and be in range for attacks. The main tank should go where the OT is, the closer the better, taking Faerlina with him. The Offtank should have lowered the worshipper's health to 15% or less.
When the enrage is up, all DPS should burst their CD to insta-kill the worshipper. If done properly Faerlina's enrage should fade, and MT can move Faerlina back to the center of the room, where DPS can resume on her.
Rinse & Repeat every time the enrage timer is close.
NOTE: Off-Tank should stop DPS worshippers at some time, because he/she will kill them all otherwise.
Maexxna
Web Wrap:
Cast at the 20 second mark, and then every 40 seconds after that. Sends one player flying towards the webs on the Western side of the wall, encasing them in a cocoon and incapacitating them. This ability sends the player to the same place all the time, and therefore positioning the DPS where the cocoons will spawn makes for much easier destruction of the cocoon. When encased, 2475 to 3025 Nature damage is done every 2 seconds. The cocoon, which is called "Web Wrap" and has about 6,000 health, can be destroyed from the outside.
Web Spray:
Cast every 40 seconds incapacitating everyone in the room including the tank for 6 seconds, dealing 1750 to 2250 Nature damage. This ability cannot be resisted, and the only way to avoid it is to be dead, have Flask of Petrification, have Divine Intervention, or be already incapacitated by Web Wrap.
Poison Shock:
Inflicts 3500 to 4500 Nature damage in a 15 yard frontal cone in front of Maexxna every 10 seconds.
Necrotic Poison:
Reduces healing taken by 90% for 30 seconds. This needs to be cleansed immediately, Abolish Poison being the most effective way to remove it during the Web Spray. Applied to targets in melee range in front of Maexxna, generally the tank.
Frenzy:
At 30% health, Maexxna will go into a killing frenzy that cannot be removed. Increases physical damage by 50%, melee haste by 50% and size by 15%.
Maexxna Spiderlings - 8 Small spiders are spawned at the 30 second mark, and then every 40 seconds after that. These hit for about 1,000 on cloth and have about 7,300 HP.
Strategy
Before the encounter begins have your raid move into the lair to the southwest side (left for the directionally challenged). In front of you will be the boss and a rectangular column poking through the web. Your tank will engage Maexxna at the protruding column while your ranged DPS and healers set up to the west. If you have a mage it is beneficial to have them down with the melee to Frost Nova the spiders when they are summoned and then AOE them down. When someone is in Web Wrap they will be flung to one of two spots on the western wall. Designate two ranged DPS to destroy the webbing in case one of them gets wrapped. Once Maexxna is down to 33% health, stop DPS and wait for a Web Spray. After that is done, blow all your cooldowns and enjoy the DPS race. Healers must keep the Main Tank at full health and use HoTs in case your DPS is unable to bring down the boss. A good tip for warrior tanks is to use Shield block every Web Spray, the cooldowns line up well and it really helps the healers.
Edit: Shield Wall should be saved for the 1st web spray after enrage. If Your group is not doing 11k DPS (not sure about the figures) your tank will have to survive another web spray.
The off tank should taunt the boss off the MT and use their "shield wall" equivalent, cooldown. If your raid hasn't killed Maexxna by the 3rd web wrap during enrage, it is likely u need more dps.
A web-covered wing of Spiders and Cultists of the Cult of the Damned. Three bosses. This is the entry level quarter, usually the first one targeted by guilds to gear up their players. Bring Poison Cleanse abilities and consistent DPS.
Bosses:
- Anub'Rekhan: A beetle-like Nerubian Crypt Lord.
- Grand Widow Faerlina: High ranking Cult-mistress of the Cult of the Damned.
- Maexxna: A colossal highly poisonous Spider.
Anub'Rekhan
- Anub'Rekhan has approximately 2,230,000 hit points.
Impale:
This is an area-of-effect ability that targets a random player and hits everyone in a straight line between Anub'Rekhan and the player, causing 4813 to 6187 physical damage and launching the affected players high in the air, who then suffer 50% fall damage when they hit the ground.
Locust Swarm:
Every 70-120 seconds, Anub'Rekhan slows to 60% normal run speed and casts a spell that causes AoE damage in a 30-yard radius around him that centers around him as he moves. Remaining in the radius of effect causes a DoT debuff of 875 to 1125 nature damage every 2 seconds that stacks repeatedly, and which silences those afflicted. When he casts this spell, another Crypt Guard also spawns at his initial engage point. Lasts 16 seconds.
Notes:The Locust Swarm attack has an approximately 90-second cooldown, but the first cast may occur between 80 seconds and 2 minutes. Its silencing ability is unlike a normal silence, as it prevents the use of all abilities, even auto-attack. This means that the main tank cannot use Shield Wall or Last Stand to save himself if he gets stacked too high. Items, however, may still be used.
Aspect of the Pack can be used to get out of the Locust Swarm range but requires timing and coordination from the Main Tank and Hunter. Unholy Aura will also work if the Death knight stands a little further ahead of the kiting path and runs with the Main Tank to the initial tanking position. If you are late on your kiting and start stacking up the debuff, drink a swiftness potion.
Summon Corpse Scarabs:
Whenever there is a corpse in the room (either a player or a Crypt Guard) Anub'Rekhan can spawn corpse scarabs from it. This is not on a set timer. Ten will be spawned from a Crypt Guard and Five from a player. They spawn with threat on random players and will spread out and attack random targets.
Crypt Guards
One of these adds spawns after every Locust Swarm. In addition, one spawns approximately 20 seconds after Anub'Rekhan is pulled. They have around 234,000 health. They have a cleave, a stacking acid spit DoT that ticks for 500 a stack, and a low-hp frenzy that increases damage by 50% and attack speed by 60%.
Strategy
The kiting strategy can be difficult to master for a group with poor coordination. Ranged DPS might get caught in the swarm trying to kill the adds when the tank kites, and cause everything to go wrong. An alternative strategy is to not kite at all, but have the tank stay put and take the full damage of the swarm while the healers spam heals on him. This is entirely possible and will make the fight more of a tank-and-spank with extra healing on the swarm. Death Knights are good tanks for this tactic because they can time their damage reduction ability with the swarm and take less damage. Tanks simply have to make sure that they use their damage reduction ability before the swarm because it silences them.
Once you enter the area where Anub'Rekhan is located, have a hunter misdirect (if available) onto the main tank and pull the boss to the actual entrance doorway area and tank it there while the rest of the raid runs forward and splits into a semi-circle roughly in the center of the room. Have your secondary tank behind everyone, where the adds spawn. All ranged DPS should spread around to avoid the impale. The offtank can add some DPS or even some off-healing to the party, but be ready to pick up the adds that spawn in the back, as they can easily one-shot a cloth wearer. Once the add spawns and the offtank picks it up, all the DPS has to do is simply turn around and burn it down. Do the same when the Corpse Scarabs spawn. This tactic is meant to reduce any kind of confusion in the kiting method, so separating the boss and the add makes the fight really simple. Remember that this method only really work if your healers keep the main tank topped up, especially during the locust swarm. Due to the massive damage that tanks take from the end of a Locust Swarm, any off-healers—such as shamans or paladins—should assist in keeping the main tank alive during this phase.
Note: The adds do not hit the offtank really hard, but with a low-DPS group the damage debuff can stack and be really painful. A nice way to prevent extra damage is to stun, as this prevents them from casting the debuffs at all; these debuffs last for 10 seconds and are reapplied every 2 seconds, so if you can cast a stun (such as Hammer of Justice) when your tank has 8 seconds left on the debuff, and add one more at 2 seconds, the debuff will start to 0 again, largely reducing the damage taken. The goal is to have a chain stun ready when the elite is around 50% health to reduce the overall damage taken. The adds are undead, so the paladin undead AoE stun can work for 1 sec.
Extra Note: The small adds that spawn from the corpse are really fast and can get out of a consecrate.
Grand Widow Faerlina
- She has approximately 2,230,000 hit points.
Poison Bolt Volley:
This will hit the three closest players to Grand Widow Faerlina, used every on average every 12 to 15 seconds, but sometimes with as little as seven or eight seconds between casts. Deals 2625 to 3375 Nature damage and applies a dot that does 1480 to 1720 Nature damage every 2 seconds for eight seconds. Dispellable. Widow's Embrace prevents the use of this ability for 30 seconds.
Rain of Fire:
Random Rains of Fire will be cast on players throughout the fight, at intervals of anywhere from six to eighteen seconds. 1750 to 2750 Fire damage every two seconds. Rain of Fire lasts six seconds. 8 yard radius.
Frenzy:
This will be used approximately every 60–80 seconds. It will increase Grand Widow Faerlina's physical damage by 150%, her melee haste by 50% and her size by 50%. During it she will hit the tank for upwards of 15,000 damage. Widow's Embrace dispels and prevents the use of this ability for 60 seconds.
NOTE: Faerlina's Frenzy cannot be removed by hunters' Tranquilizing Shot.
NOTE: You must kill the worshipper AFTER she enrages if you want to stop her for the full 60 seconds. If you sacrifice the Worshipper before the enrage, it will merely delay the enrage for 30 seconds.
Worshippers
There are 4 "Naxxramas Worshipper" NPCs at the start of the fight.
They will be off-tanked for most of the fight, and eventually sacrificed to Faerlina. When killed near Faerlina, they will remove and prevent Frenzy as well as silence Faerlina's nature school for 30 seconds. This fight cannot last more than 4:45 or so because there will be no way to prevent the Frenzy if all the adds are dead. It should be noted that in 10-man, the Worshippers are immune to Mind Control, and must be DPSed down. This can be tricky if your off-tank is overzealous and brings one in particular down too fast. Predetermine a kill order for the worshippers (raid marks work well), and bring one down to ~5%, then kill it once Faerlina enrages.
Strategy
You will need two tanks. One tank will pick up the worshippers and offtank them right under the stairs on the left side. Any tank class is good at tanking them, as they don't deal high loads of damage. The main tank will pick up Faerlina after the OT pulls the rest and drag her to the middle of the room where everyone will spread out around her. Every DPS should focus ONLY in Faerlina, ignoring the four adds till the enrage phase is near.
The off-tank will pick all four adds, and start DPSing one of them: the one who must be killed in order to stop Faerlina's enrage.
When the frenzy is about to come off cooldown (10 secs or so) every DPS should stop all DPS and switch target to the worshipper marked to kill. Do not start attacking it, just target it and be in range for attacks. The main tank should go where the OT is, the closer the better, taking Faerlina with him. The Offtank should have lowered the worshipper's health to 15% or less.
When the enrage is up, all DPS should burst their CD to insta-kill the worshipper. If done properly Faerlina's enrage should fade, and MT can move Faerlina back to the center of the room, where DPS can resume on her.
Rinse & Repeat every time the enrage timer is close.
NOTE: Off-Tank should stop DPS worshippers at some time, because he/she will kill them all otherwise.
Maexxna
- Maexxna has approximately 2,510,000 hit points.
Web Wrap:
Cast at the 20 second mark, and then every 40 seconds after that. Sends one player flying towards the webs on the Western side of the wall, encasing them in a cocoon and incapacitating them. This ability sends the player to the same place all the time, and therefore positioning the DPS where the cocoons will spawn makes for much easier destruction of the cocoon. When encased, 2475 to 3025 Nature damage is done every 2 seconds. The cocoon, which is called "Web Wrap" and has about 6,000 health, can be destroyed from the outside.
Web Spray:
Cast every 40 seconds incapacitating everyone in the room including the tank for 6 seconds, dealing 1750 to 2250 Nature damage. This ability cannot be resisted, and the only way to avoid it is to be dead, have Flask of Petrification, have Divine Intervention, or be already incapacitated by Web Wrap.
Poison Shock:
Inflicts 3500 to 4500 Nature damage in a 15 yard frontal cone in front of Maexxna every 10 seconds.
Necrotic Poison:
Reduces healing taken by 90% for 30 seconds. This needs to be cleansed immediately, Abolish Poison being the most effective way to remove it during the Web Spray. Applied to targets in melee range in front of Maexxna, generally the tank.
Frenzy:
At 30% health, Maexxna will go into a killing frenzy that cannot be removed. Increases physical damage by 50%, melee haste by 50% and size by 15%.
Maexxna Spiderlings - 8 Small spiders are spawned at the 30 second mark, and then every 40 seconds after that. These hit for about 1,000 on cloth and have about 7,300 HP.
Strategy
Before the encounter begins have your raid move into the lair to the southwest side (left for the directionally challenged). In front of you will be the boss and a rectangular column poking through the web. Your tank will engage Maexxna at the protruding column while your ranged DPS and healers set up to the west. If you have a mage it is beneficial to have them down with the melee to Frost Nova the spiders when they are summoned and then AOE them down. When someone is in Web Wrap they will be flung to one of two spots on the western wall. Designate two ranged DPS to destroy the webbing in case one of them gets wrapped. Once Maexxna is down to 33% health, stop DPS and wait for a Web Spray. After that is done, blow all your cooldowns and enjoy the DPS race. Healers must keep the Main Tank at full health and use HoTs in case your DPS is unable to bring down the boss. A good tip for warrior tanks is to use Shield block every Web Spray, the cooldowns line up well and it really helps the healers.
Edit: Shield Wall should be saved for the 1st web spray after enrage. If Your group is not doing 11k DPS (not sure about the figures) your tank will have to survive another web spray.
The off tank should taunt the boss off the MT and use their "shield wall" equivalent, cooldown. If your raid hasn't killed Maexxna by the 3rd web wrap during enrage, it is likely u need more dps.
Last edited by Pinwinnie on Sun Jan 18, 2009 7:12 pm; edited 5 times in total
Pinwinnie- Posts : 26
Join date : 2009-01-15
Age : 44
Location : The Netherlands
Re: Naxxramas 10 men guide
![]() Pinwinnie Sun Jan 18, 2009 6:56 pm
Pinwinnie Sun Jan 18, 2009 6:56 pm
Plague Quarter (summary of the information provided by wowwiki)
A wing of strange fungus, ghouls, gargoyles, maggots and other plagued monstrosities. Three bosses.
Bosses:
Noth the Plaguebringer
Curse of the Plaguebringer:
Curses three random players. If they are not decursed within 10 seconds they will inflict Wrath of the Plaguebringer on themselves and all allies within 30 yards.
Wrath of the Plaguebringer:
For every missed curse everyone within 30 yards will suffer 3700 to 4300 immediate shadow damage and 1313 to 1687 shadow damage every 2 seconds for ten seconds. Unlike the 25-man version this is healable as you may not have any decursers.
Summon Plagued Warriors
Every 30 seconds, Noth the Plaguebringer will summon two Plagued Warriors. These have ~100,000 hit points and melee for ~1,000 on plate. They can cleave.
Berserk
Noth the Plaguebringer will Berserker Enrage after three skeleton phases. This will increase his damage by 1000%.
Phase Two
Every 110 seconds of combat Noth will teleport away to a balcony and become invulnerable while waves of skeletons attack the raid. Phase two lasts 70 seconds after which Noth will commence phase one again.
Plagued Champions
These have ~105,000 HP and melee for ~2500 on plate. They have mortal strike. Two will come at a time with two waves total.
Plagued Guardian
These will only appear in the second and third skeleton phases. They have ~75,000 HP and melee for ~1,000 on plate. They will cast Arcane Explosion which will deal ~4,000 damage to all targets within 30 yards. One of these will replace one Plagued Champion in each wave. Due to the fact it is quite possible to kill Noth before the second skeleton phase it is unlikely you will encounter these.
Strategy
Prompt removal of the Curse of the Plaguebringer is critical. Cripple should also be dispelled as soon as possible, especially on the tank. It is possible to heal through one missed curse/wrath, but the total damage to the raid can be as much as 100,000 per application and this should be viewed as a last resort.
If no decursing is available, those targeted with the curse need to run to three separate locations more than 30 yards from the raid, so that Wrath only hits them.
Easiest for entry-level raids is to pursue a slow and steady strategy, where some dps is devoted to keeping the skeleton adds down to a reasonable number, and it is accepted that Noth will reach phase 2. This is most reliable if the raid has good healing endurance but overall dps is less than 14000. Assigning two dps (as well as a tank) to adds should be enough.
A quicker strategy, for raids with good dps (14000 or greater) and a suitable tank, is to tank all of the skeleton adds and just burn down Noth. In this case the goal is to kill Noth before he enters Phase 2, avoiding the Plagued Warriors entirely. If dps comes up short it is not necessarily a wipe, but as many as eight adds will be up at the beginning of Phase 2. Alternatively, this strategy can be done intentionally and the adds can be aoe'd down as a group at the start of phase 2. This tactic can be used for a group with two solid tanks and two heals focuses on each, as well as suitable aoe damage dealers.
In either case, two tanks are needed — one to pick up the adds as they spawn on the bone piles, and one for Noth. The better geared tank should be assigned to add tanking as the damage output of the skeletons will be greater than that of Noth once five or more of them are being held.
Heigan the Unclean
Spell Disruption:
This is a 20-yard aura around Heigan the Unclean. It will increase cast times by 300%.
Decrepit Fever:
This is a disease applied to a random player which will do 3,000 Nature damage every 3 seconds and reduce the maximum hit points of every player within 20 yards by 50%.
Phase Two abilities
After 90 seconds Heigan will teleport to the middle of the raised platform and begin chanelling.
Plague Cloud:
Deals 7,500 Nature damage a second to any player remaining on the raised platform during Phase Two.
Eruption:
Three quarters of the remaining area of the room will be hit by eruption every few seconds during Phase Two. Does 6650 to 7350 Nature damage on a hit. Near the edge of a safe spot players will only be hit once. In the middle of unsafe spots they will be hit multiple times which is generally fatal.
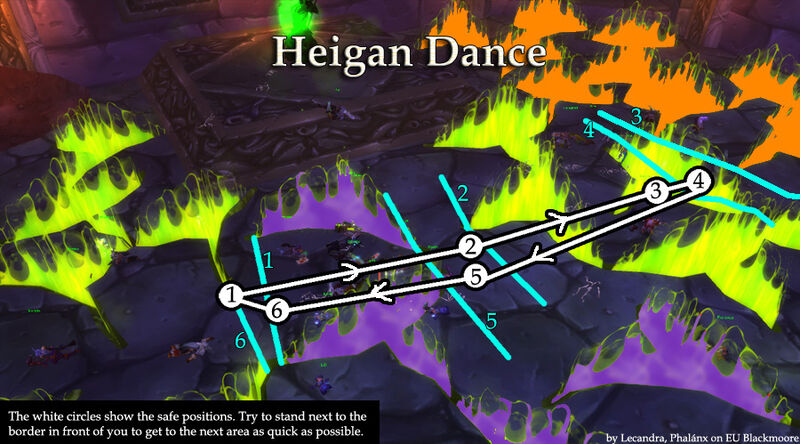
Strategy
The fight goes as a 135 second cycle:
Phase 1: Heigan is in the field for 90 seconds. Ground Eruptions move slowly, the tank has to move Heigan through the room to avoid the eruptions.
Phase 2: Heigan teleports on the platform for 45 seconds. Ground Eruptions speed up, the entire raid needs to move through the safe zones (see Heigan Dancing Lesson for detailed video tutorial). The platform has to be empty. Heigan will not use Spell Disruption, Teleport and Decrepit Fever during phase 2.
Tips
Whenever a phase change occurs, the safe zone is reset to zone 1.
Safe zones move in the following order: 1 - 2 - 3 - 4 - 3 - 2 - 1 - 2 - ...
Aggro does NOT reset between phases.
Due to latency, other players may or may not appear in the correct position for you. Move at your own pace, do not try to follow other players.
One of the most common reasons for death is running too far on either side of the room. If you are running from section 3 to section 4, you only need to take a few steps (between other pieces, you need to cross the entire next section, something not necessary for their sections one or four). It is possible to cast in the time this buys.
Safe zone cycle is, for phase one: 1-2-3-4-3-2-1-2~3. So, it is the way to 4, back to 1, and then almost to 3. It is this way at least for 10man. At the moment Heigan teleports, move QUICKLY back to zone 1. It will reset the cycle to zone 1 again.
In phase two, move forward as soon as you see the lava coming up (not too quick, though). The best timing is to move to safe spot, stop ONE second, then move to the next safe spot. JUST one second.
There is no enrage timer on this fight, so it can go on as long as you can keep some sort of DPS up. Heigan has been killed in fights taking longer than 15 minutes (due to deaths.)
Loatheb
Necrotic Aura:
Every 20 seconds Loatheb will cast Necrotic Aura on the raid, reducing all healing done by 100% for 17 seconds. This means you get 3 seconds to heal every 20 seconds.
Deathbloom:
Every 30 seconds Loatheb will cast this on the raid. Does 200 Nature damage a second for six seconds followed by a 'Bloom' of death for 1200 damage as a reverse Lifebloom. Undispellable.
Inevitable Doom:
Loatheb begins to cast it after two minutes of combat. Inflicts 4000 Shadow damage after 10 sec. 100 yards, every 30 secs. 5 mins after engaging, this will be every 15 secs. This debuff can not be dispelled, cleansed, or decursed and the damage can not be resisted. Ice block, Cloak of shadows and divine shield will remove it.
Fungal Creep:
This is a beneficial "debuff" on players gained during the encounter. Critical chance increased by 50%. Spells and abilities cause no threat. 90 secs duration. Loatheb summons spores approximately every 30 secs. Killing the spore (which has very low HP) allows five people within 10 yards to receive this buff.
Strategy
Raids are usually made up of 2 tanks, 3 healers, and 5 DPS. Therefore, a "little kids soccer game" mentality can be used to properly manage the spores - the critical aspect of this fight. As with any soccer game, you have spectators and the kids out on the field that run amuck while the ball bounces around the field.
Position Loatheb in the center of the room. Two healers should be positioned between him and the entry door, closer to Loatheb than the door. Assign one healer to the main tank, and other one to the off-tank and all remaining members. Tip: Tanks can swap aggro to balance damage. This means Group 1 of the raid is built from 2 tanks, 2 healers, and 1 DPS - the "spectators".
Group 2 is the "soccer team", and is built using 4 DPS and an AOE Healer. The 1 DSP from Group 1 should be assigned to following this group. When a spore ("ball") pops into existance, the team rushes over to pop it making sure that all 5 DPS (4 from G2 and 1 from G1) are near the spore. The healer needs to be close, but no closer than any DPS. All DPS then turn all fire onto Loatheb from where they are standing. When the next spore emerges, they all run over and "kick" it to get the buff, then return to DPS.
It's important that all DPS obtain the buff 100% of the fight, or you may not be able to sustain enough DPS. Using in-game tools, 12k DPS should be enough to defeat Loatheb.
This method of a group migrating around the room and firing from spore locations will keep the DPS far more consistent than having two groups alternate. Any movement should be reduced as much as possible, as that lowers your raid's overall DPS. It's good to mark the AOE healer so that stragler DPS can find their way quickly. As the fight progresses, you may want the AOE Healer to pick up the buff from one of your DPS. This will aid in keeping the group alive as you near Doom #20 or even #25.
A wing of strange fungus, ghouls, gargoyles, maggots and other plagued monstrosities. Three bosses.
Bosses:
- Noth the Plaguebringer: A Necromancer specialized in curses and summoning.
- Heigan the Unclean: A Necromancer specialized in diseases and dancing.
- Loatheb: A giant Fungal Monster.
Noth the Plaguebringer
- Noth the Plaguebringer has ~2.5 million hit points.
Curse of the Plaguebringer:
Curses three random players. If they are not decursed within 10 seconds they will inflict Wrath of the Plaguebringer on themselves and all allies within 30 yards.
Wrath of the Plaguebringer:
For every missed curse everyone within 30 yards will suffer 3700 to 4300 immediate shadow damage and 1313 to 1687 shadow damage every 2 seconds for ten seconds. Unlike the 25-man version this is healable as you may not have any decursers.
Summon Plagued Warriors
Every 30 seconds, Noth the Plaguebringer will summon two Plagued Warriors. These have ~100,000 hit points and melee for ~1,000 on plate. They can cleave.
Berserk
Noth the Plaguebringer will Berserker Enrage after three skeleton phases. This will increase his damage by 1000%.
Phase Two
Every 110 seconds of combat Noth will teleport away to a balcony and become invulnerable while waves of skeletons attack the raid. Phase two lasts 70 seconds after which Noth will commence phase one again.
Plagued Champions
These have ~105,000 HP and melee for ~2500 on plate. They have mortal strike. Two will come at a time with two waves total.
Plagued Guardian
These will only appear in the second and third skeleton phases. They have ~75,000 HP and melee for ~1,000 on plate. They will cast Arcane Explosion which will deal ~4,000 damage to all targets within 30 yards. One of these will replace one Plagued Champion in each wave. Due to the fact it is quite possible to kill Noth before the second skeleton phase it is unlikely you will encounter these.
Strategy
Prompt removal of the Curse of the Plaguebringer is critical. Cripple should also be dispelled as soon as possible, especially on the tank. It is possible to heal through one missed curse/wrath, but the total damage to the raid can be as much as 100,000 per application and this should be viewed as a last resort.
If no decursing is available, those targeted with the curse need to run to three separate locations more than 30 yards from the raid, so that Wrath only hits them.
Easiest for entry-level raids is to pursue a slow and steady strategy, where some dps is devoted to keeping the skeleton adds down to a reasonable number, and it is accepted that Noth will reach phase 2. This is most reliable if the raid has good healing endurance but overall dps is less than 14000. Assigning two dps (as well as a tank) to adds should be enough.
A quicker strategy, for raids with good dps (14000 or greater) and a suitable tank, is to tank all of the skeleton adds and just burn down Noth. In this case the goal is to kill Noth before he enters Phase 2, avoiding the Plagued Warriors entirely. If dps comes up short it is not necessarily a wipe, but as many as eight adds will be up at the beginning of Phase 2. Alternatively, this strategy can be done intentionally and the adds can be aoe'd down as a group at the start of phase 2. This tactic can be used for a group with two solid tanks and two heals focuses on each, as well as suitable aoe damage dealers.
In either case, two tanks are needed — one to pick up the adds as they spawn on the bone piles, and one for Noth. The better geared tank should be assigned to add tanking as the damage output of the skeletons will be greater than that of Noth once five or more of them are being held.
Heigan the Unclean
- Heigan the Unclean has approximately 3,060,000 hit points.
Spell Disruption:
This is a 20-yard aura around Heigan the Unclean. It will increase cast times by 300%.
Decrepit Fever:
This is a disease applied to a random player which will do 3,000 Nature damage every 3 seconds and reduce the maximum hit points of every player within 20 yards by 50%.
Phase Two abilities
After 90 seconds Heigan will teleport to the middle of the raised platform and begin chanelling.
Plague Cloud:
Deals 7,500 Nature damage a second to any player remaining on the raised platform during Phase Two.
Eruption:
Three quarters of the remaining area of the room will be hit by eruption every few seconds during Phase Two. Does 6650 to 7350 Nature damage on a hit. Near the edge of a safe spot players will only be hit once. In the middle of unsafe spots they will be hit multiple times which is generally fatal.
Strategy
The fight goes as a 135 second cycle:
Phase 1: Heigan is in the field for 90 seconds. Ground Eruptions move slowly, the tank has to move Heigan through the room to avoid the eruptions.
Phase 2: Heigan teleports on the platform for 45 seconds. Ground Eruptions speed up, the entire raid needs to move through the safe zones (see Heigan Dancing Lesson for detailed video tutorial). The platform has to be empty. Heigan will not use Spell Disruption, Teleport and Decrepit Fever during phase 2.
Tips
Whenever a phase change occurs, the safe zone is reset to zone 1.
Safe zones move in the following order: 1 - 2 - 3 - 4 - 3 - 2 - 1 - 2 - ...
Aggro does NOT reset between phases.
Due to latency, other players may or may not appear in the correct position for you. Move at your own pace, do not try to follow other players.
One of the most common reasons for death is running too far on either side of the room. If you are running from section 3 to section 4, you only need to take a few steps (between other pieces, you need to cross the entire next section, something not necessary for their sections one or four). It is possible to cast in the time this buys.
Safe zone cycle is, for phase one: 1-2-3-4-3-2-1-2~3. So, it is the way to 4, back to 1, and then almost to 3. It is this way at least for 10man. At the moment Heigan teleports, move QUICKLY back to zone 1. It will reset the cycle to zone 1 again.
In phase two, move forward as soon as you see the lava coming up (not too quick, though). The best timing is to move to safe spot, stop ONE second, then move to the next safe spot. JUST one second.
There is no enrage timer on this fight, so it can go on as long as you can keep some sort of DPS up. Heigan has been killed in fights taking longer than 15 minutes (due to deaths.)
Loatheb
- Loatheb's melee is relatively weak. Loatheb has approximately 6,690,000 hit points.
Necrotic Aura:
Every 20 seconds Loatheb will cast Necrotic Aura on the raid, reducing all healing done by 100% for 17 seconds. This means you get 3 seconds to heal every 20 seconds.
Deathbloom:
Every 30 seconds Loatheb will cast this on the raid. Does 200 Nature damage a second for six seconds followed by a 'Bloom' of death for 1200 damage as a reverse Lifebloom. Undispellable.
Inevitable Doom:
Loatheb begins to cast it after two minutes of combat. Inflicts 4000 Shadow damage after 10 sec. 100 yards, every 30 secs. 5 mins after engaging, this will be every 15 secs. This debuff can not be dispelled, cleansed, or decursed and the damage can not be resisted. Ice block, Cloak of shadows and divine shield will remove it.
Fungal Creep:
This is a beneficial "debuff" on players gained during the encounter. Critical chance increased by 50%. Spells and abilities cause no threat. 90 secs duration. Loatheb summons spores approximately every 30 secs. Killing the spore (which has very low HP) allows five people within 10 yards to receive this buff.
Strategy
Raids are usually made up of 2 tanks, 3 healers, and 5 DPS. Therefore, a "little kids soccer game" mentality can be used to properly manage the spores - the critical aspect of this fight. As with any soccer game, you have spectators and the kids out on the field that run amuck while the ball bounces around the field.
Position Loatheb in the center of the room. Two healers should be positioned between him and the entry door, closer to Loatheb than the door. Assign one healer to the main tank, and other one to the off-tank and all remaining members. Tip: Tanks can swap aggro to balance damage. This means Group 1 of the raid is built from 2 tanks, 2 healers, and 1 DPS - the "spectators".
Group 2 is the "soccer team", and is built using 4 DPS and an AOE Healer. The 1 DSP from Group 1 should be assigned to following this group. When a spore ("ball") pops into existance, the team rushes over to pop it making sure that all 5 DPS (4 from G2 and 1 from G1) are near the spore. The healer needs to be close, but no closer than any DPS. All DPS then turn all fire onto Loatheb from where they are standing. When the next spore emerges, they all run over and "kick" it to get the buff, then return to DPS.
It's important that all DPS obtain the buff 100% of the fight, or you may not be able to sustain enough DPS. Using in-game tools, 12k DPS should be enough to defeat Loatheb.
This method of a group migrating around the room and firing from spore locations will keep the DPS far more consistent than having two groups alternate. Any movement should be reduced as much as possible, as that lowers your raid's overall DPS. It's good to mark the AOE healer so that stragler DPS can find their way quickly. As the fight progresses, you may want the AOE Healer to pick up the buff from one of your DPS. This will aid in keeping the group alive as you near Doom #20 or even #25.
Last edited by Pinwinnie on Fri Jan 30, 2009 1:29 am; edited 3 times in total
Pinwinnie- Posts : 26
Join date : 2009-01-15
Age : 44
Location : The Netherlands
Re: Naxxramas 10 men guide
![]() Pinwinnie Sun Jan 18, 2009 6:57 pm
Pinwinnie Sun Jan 18, 2009 6:57 pm
Military Quarter (summary of the information provided by wowwiki)
A wing of Death Knights and their steeds.
Bosses:
Instructor Razuvious
Disrupting Shout:
This is a physical AoE that hits for 4275 to 4725 Physical damage on the entire raid. Cannot be avoided, cast every ~15 seconds.
Jagged Knife:
An ability used on a random raid member every ~10 seconds. Does 5,000 physical damage and applies a bleed effect which causes a further 10,000 physical damage over 5 seconds. Can be avoided by standing out of his line of sight.
Unbalancing Strike:
Inflicts 350% weapon damage and leaves the target unbalanced, reducing their defense skill by 100 for 6 seconds. This will hit plate for approximately 105,000. Only Deathknight Understudies should ever be hit by this.
Death Knight Understudies
Two of these are pulled with Instructor Razuvious. They hit lightly and should be mind controlled for most of the encounter. A player will need to use the orbs of domination to mind control one and at least one should always be mind controlled through the encounter. Healers will need to heal them through Instructor Razuvious' damage. After Instructor Razuvious dies these will take 1000% extra damage from players.
Blood Strike: Instant attack that inflicts 50% weapon damage to an enemy target, 4 sec cooldown. Will be the "4" key on your hotbar.
Taunt: Taunts the target to attack you, 20 second cooldown. Will be "5" on your hotbar.
Bone Barrier: Reduces damage taken by 75% for 20 seconds. Death Knight understudies should only tank with this up. 30 second cooldown. Will be "6" on your hotbar.
Strategy
There are 2 Understudies and 2 controlling orbs in the 10 man version. The 2 orbs should be controlled by the tanks and the encounter is started by each tank selecting their own understudy, walking up to their orb and right clicking it to control them. Razuvious will immediately aggro onto them and which ever tank is decided to tank first must immediately hit "6" on your new hotbar for Bone Barrier, then "5" to taunt. While tanking use the "4" key repeatedly to Blood Strike for holding aggro. Keep Razuvious tanked near the back of the circle where the understudies are located before the encounter starts, this way when you refresh your orb spell you will have plenty of time to recontrol your understudy before he can run all the way to you. Bone Barrier lasts 20 secs so the 2nd tanking understudy must hit their Bone Barrier and taunt before the first tank's Bone Barrier runs out. There is a 30 second CD on the Bone Barrier. To help your healers and ensure the understudies always have Bone Barrier up, taunt closer to every 16 seconds, rather than 20. The tanks can see the Bone Barrier icon's 30 second CD timer on the pet bar. Once it goes past halfway, the tank should call out for a taunt. Calling out is helpful because when a tank has to dismiss and re-control an understudy, he can lose track of the timer. ALWAYS use the Bone Barrier ability BEFORE you taunt. This is all the fight is, the tanks trading taunts to ensure the tanking understudy has Bone Barrier up 100% of the time. Healers will need to help heal the understudies even with their Bone Barrier up to ensure both stay alive through the entire encounter.
When clicking an orb to control an understudy you will see that your character is channeling the spell and the channel lasts for 1 minute. To make sure the channel does not break while tanking Razuvious each tank should refresh the channeling spell every 2 taunt cycles. In order to do this after you've been taunted off of the second time IMMEDIATELY right click the understudy's pet frame and select "dismiss". NOTE: you cannot use the "leave vehicle" button that shows up in the "=" of your hotbar, it does nothing, you must dismiss manually. As soon as you have dismissed the understudy click the orb again to control him, this refreshes your channeling spell and will leave you with enough time for the 5 second cooldown on your abilities to be off before the current tanks Bone Barrier falls off.
Tips: Tank the boss in the far center of the green floor. Whenever you need to dismiss and re-control the add, move the add to the right/left far end of the room. This way, the add will come straight to you and because all melee players are in the center, you have clear sight of him to target. Even better, you can start the fight by using /focus on your add, and clic on his portrait to target it whenever you need to take control of it again. Dismiss, clic on portrait, wait 2-3 seconds to the "uncontrolable" buff to wear off, and right clic on the orb without moving to MC him again.
Gothik the Harvester
Phase one
Gothik the Harvester is invulnerable. Through the first four minutes and thirty-four seconds of the fight adds will spawn on the left side of Gothik's room. These are:
Living Side
Unrelenting Trainee Non Elite Humanoid, Can not be CC'd
24 will spawn through the encounter.
Hitpoints: ~10,000
Attacks:
Death Plague Applied on a melee hit, this is a disease dot that does 85 Nature damage every 3 seconds for 15 seconds. Stacks infinitely. Dispellable.
Unrelenting Deathknight Elite Humanoid, Can not be CC'd, but susceptible to snares
Seven will spawn through the encounter.
Hitpoints: ~34,000
Attacks:
Intercept - Stuns you for 3 seconds.
Shadow Mark - Shadow Mark is a melee range whirlwind attack that applies the Shadow Mark to anyone hit. Hits for ~3,500 on plate.
Unrelenting Rider Elite Humanoid, Can't be CC'd
Four will spawn through the encounter.
Hitpoints: ~55,000
Attacks:
Unholy Aura - Automatically inflicting 350 Shadow damage every 2 sec. to nearby enemies within 45 yards. It lasts until Unrelenting Rider is killed. Resistible.
Shadowbolt Volley - This attack/spell hits people afflicted by Shadow Mark for 4,000 shadow damage.
Undead Side
Whenever a living mob is slain on the live side its spirit will transfer to the undead side and spawn a corresponding undead mob there. Unrelenting Riders will spawn both a Spectral Rider and a Spectral Horse.
Spectral Trainee Non Elite Undead
Hitpoints: ~10,000
Attacks:
Arcane Explosion - Hits for 700 Arcane damage. AoE spell with a 20 yard range, this spell is resistible.
Spectral Deathknight Elite Undead
Hitpoints: ~33,000
Attacks:
Whirlwind - ~2,700 on plate.
Spectral Rider Elite Undead, cannot be CCed
Hitpoints: ~55,000
Attacks:
Unholy Aura - Automatically inflicting 350 Shadow damage every 2 sec. to nearby enemies within 45 yards. It lasts until Unrelenting Rider is killed. Resistible.
Drain Life - Drains 6,000 life from their primary aggro target over 5 seconds.
Spectral Horse Elite Undead, cannot be CCed.
Hitpoints: ~16,000
Attacks:
Stomp - AoE physical attack inflicting 2313 to 2687 damage in a 10 yard radius and reducing enemies movement speed by 60% for 10 sec.
Phase two
Gothik the Harvester comes down at 4:34 after engaging, mobs stop spawning at 3:44. Gothik the Harvester has approximately 839,000 hit points, is tauntable and keeps aggro through teleports.
Shadowbolt
Gothik will chain cast 1 second Shadowbolts for 2880 to 3520 Shadow damage on his primary aggro target.
Harvest Soul
Cast every 15 seconds. Reduces the stats of the entire raid by 10%. Stacks 10 times.
Strategy
Phase 1
Split the team in two half on living side half on the undead side. At the start of the fight, make sure you DPS mobs on the living side slowly. Each mob that dies spawns on the undead side and the undead side has harder mobs, so its easy to overrun your other team if you kill the living side mobs too quickly. You may want to stack an extra DPS on the undead side for a 4-6 split. Typically tank, healer, dps, dps on living side and tank, healer, healer, dps, dps, dps on undead side.
Remember that you can more easily crowd control (CC) the living mobs (poly, sap, and frost nova) than you can with the undead mobs, as only non-elite undead can be shackled. You will also want to put logical classes on each side; for example retribution paladins should be on the undead side as they deal added damage and priests can shackle. Mages and rogues should be on the living side for their CC'ing abilities. Note that a good group should have no problem DPSing either side down, and so CCing often becomes ignored unless necessary for stopping trash from attacking healers. If this is your first time here, split your group like this: Undead - Best tank, best healer, best DPS. This is because the mobs are harder to pick up and harder to kill on Undead side. Also if your weaker group is on the living side, then it becomes easier for the undead side, as the mobs are coming in slower.
Since trainees and their undead equivalent are so weak (10k health), you should ignore them when worrying about slowing down DPS. Riders are especially important to fight correctly, because when they die they spawn two enemies on the other side (this second mob has 16k health and deals a significant amount of damage). Communication is vital once wave 9 hits; you should not be killing the stronger mobs on the living side if the undead side is overrun.
If anyone dies, it will probably be a wipe as DPS won't be high enough to fight off the final waves and take Gothik down far enough for the center gate to open. If the players on the undead side go down, the living side will have to take on the remaining undead mobs when the gate opens. Although you may be able to clear the undead, your DPS will probably not be strong enough to take down Gothik.
Phase 2
Gothik will teleport down to the middle of the living side, and after about 10 seconds he will teleport to the undead side. During this time, all remaining adds must be killed on both sides. Gothik will continue to go back and forth between the two sides until he reaches 30%, at which point the gate in the middle will open up. Players on the opposite side of Gothik can now join with the other group. DPS Gothik as fast as you can, as the Harvest Soul debuff will be stacking (even at 10 stacks, a full party should have no problem surviving to get him down).
The four horsemen
more coming soon
A wing of Death Knights and their steeds.
Bosses:
- Instructor Razuvious: The Death Knight trainer of Naxxramas.
- Gothik the Harvester: Grand Necromancer of the Lich King and the legions he commands.
- The Four Horsemen: Four mounted high ranking Death Knight bosses at once.
Instructor Razuvious
- Instructor Razuvious has approximately 3,349,000 hit points. His regular melee hits plate for about 30,000.
Disrupting Shout:
This is a physical AoE that hits for 4275 to 4725 Physical damage on the entire raid. Cannot be avoided, cast every ~15 seconds.
Jagged Knife:
An ability used on a random raid member every ~10 seconds. Does 5,000 physical damage and applies a bleed effect which causes a further 10,000 physical damage over 5 seconds. Can be avoided by standing out of his line of sight.
Unbalancing Strike:
Inflicts 350% weapon damage and leaves the target unbalanced, reducing their defense skill by 100 for 6 seconds. This will hit plate for approximately 105,000. Only Deathknight Understudies should ever be hit by this.
Death Knight Understudies
Two of these are pulled with Instructor Razuvious. They hit lightly and should be mind controlled for most of the encounter. A player will need to use the orbs of domination to mind control one and at least one should always be mind controlled through the encounter. Healers will need to heal them through Instructor Razuvious' damage. After Instructor Razuvious dies these will take 1000% extra damage from players.
Blood Strike: Instant attack that inflicts 50% weapon damage to an enemy target, 4 sec cooldown. Will be the "4" key on your hotbar.
Taunt: Taunts the target to attack you, 20 second cooldown. Will be "5" on your hotbar.
Bone Barrier: Reduces damage taken by 75% for 20 seconds. Death Knight understudies should only tank with this up. 30 second cooldown. Will be "6" on your hotbar.
Strategy
There are 2 Understudies and 2 controlling orbs in the 10 man version. The 2 orbs should be controlled by the tanks and the encounter is started by each tank selecting their own understudy, walking up to their orb and right clicking it to control them. Razuvious will immediately aggro onto them and which ever tank is decided to tank first must immediately hit "6" on your new hotbar for Bone Barrier, then "5" to taunt. While tanking use the "4" key repeatedly to Blood Strike for holding aggro. Keep Razuvious tanked near the back of the circle where the understudies are located before the encounter starts, this way when you refresh your orb spell you will have plenty of time to recontrol your understudy before he can run all the way to you. Bone Barrier lasts 20 secs so the 2nd tanking understudy must hit their Bone Barrier and taunt before the first tank's Bone Barrier runs out. There is a 30 second CD on the Bone Barrier. To help your healers and ensure the understudies always have Bone Barrier up, taunt closer to every 16 seconds, rather than 20. The tanks can see the Bone Barrier icon's 30 second CD timer on the pet bar. Once it goes past halfway, the tank should call out for a taunt. Calling out is helpful because when a tank has to dismiss and re-control an understudy, he can lose track of the timer. ALWAYS use the Bone Barrier ability BEFORE you taunt. This is all the fight is, the tanks trading taunts to ensure the tanking understudy has Bone Barrier up 100% of the time. Healers will need to help heal the understudies even with their Bone Barrier up to ensure both stay alive through the entire encounter.
When clicking an orb to control an understudy you will see that your character is channeling the spell and the channel lasts for 1 minute. To make sure the channel does not break while tanking Razuvious each tank should refresh the channeling spell every 2 taunt cycles. In order to do this after you've been taunted off of the second time IMMEDIATELY right click the understudy's pet frame and select "dismiss". NOTE: you cannot use the "leave vehicle" button that shows up in the "=" of your hotbar, it does nothing, you must dismiss manually. As soon as you have dismissed the understudy click the orb again to control him, this refreshes your channeling spell and will leave you with enough time for the 5 second cooldown on your abilities to be off before the current tanks Bone Barrier falls off.
Tips: Tank the boss in the far center of the green floor. Whenever you need to dismiss and re-control the add, move the add to the right/left far end of the room. This way, the add will come straight to you and because all melee players are in the center, you have clear sight of him to target. Even better, you can start the fight by using /focus on your add, and clic on his portrait to target it whenever you need to take control of it again. Dismiss, clic on portrait, wait 2-3 seconds to the "uncontrolable" buff to wear off, and right clic on the orb without moving to MC him again.
Gothik the Harvester
Phase one
Gothik the Harvester is invulnerable. Through the first four minutes and thirty-four seconds of the fight adds will spawn on the left side of Gothik's room. These are:
Living Side
Unrelenting Trainee Non Elite Humanoid, Can not be CC'd
24 will spawn through the encounter.
Hitpoints: ~10,000
Attacks:
Death Plague Applied on a melee hit, this is a disease dot that does 85 Nature damage every 3 seconds for 15 seconds. Stacks infinitely. Dispellable.
Unrelenting Deathknight Elite Humanoid, Can not be CC'd, but susceptible to snares
Seven will spawn through the encounter.
Hitpoints: ~34,000
Attacks:
Intercept - Stuns you for 3 seconds.
Shadow Mark - Shadow Mark is a melee range whirlwind attack that applies the Shadow Mark to anyone hit. Hits for ~3,500 on plate.
Unrelenting Rider Elite Humanoid, Can't be CC'd
Four will spawn through the encounter.
Hitpoints: ~55,000
Attacks:
Unholy Aura - Automatically inflicting 350 Shadow damage every 2 sec. to nearby enemies within 45 yards. It lasts until Unrelenting Rider is killed. Resistible.
Shadowbolt Volley - This attack/spell hits people afflicted by Shadow Mark for 4,000 shadow damage.
Undead Side
Whenever a living mob is slain on the live side its spirit will transfer to the undead side and spawn a corresponding undead mob there. Unrelenting Riders will spawn both a Spectral Rider and a Spectral Horse.
Spectral Trainee Non Elite Undead
Hitpoints: ~10,000
Attacks:
Arcane Explosion - Hits for 700 Arcane damage. AoE spell with a 20 yard range, this spell is resistible.
Spectral Deathknight Elite Undead
Hitpoints: ~33,000
Attacks:
Whirlwind - ~2,700 on plate.
Spectral Rider Elite Undead, cannot be CCed
Hitpoints: ~55,000
Attacks:
Unholy Aura - Automatically inflicting 350 Shadow damage every 2 sec. to nearby enemies within 45 yards. It lasts until Unrelenting Rider is killed. Resistible.
Drain Life - Drains 6,000 life from their primary aggro target over 5 seconds.
Spectral Horse Elite Undead, cannot be CCed.
Hitpoints: ~16,000
Attacks:
Stomp - AoE physical attack inflicting 2313 to 2687 damage in a 10 yard radius and reducing enemies movement speed by 60% for 10 sec.
Phase two
Gothik the Harvester comes down at 4:34 after engaging, mobs stop spawning at 3:44. Gothik the Harvester has approximately 839,000 hit points, is tauntable and keeps aggro through teleports.
Shadowbolt
Gothik will chain cast 1 second Shadowbolts for 2880 to 3520 Shadow damage on his primary aggro target.
Harvest Soul
Cast every 15 seconds. Reduces the stats of the entire raid by 10%. Stacks 10 times.
Strategy
Phase 1
Split the team in two half on living side half on the undead side. At the start of the fight, make sure you DPS mobs on the living side slowly. Each mob that dies spawns on the undead side and the undead side has harder mobs, so its easy to overrun your other team if you kill the living side mobs too quickly. You may want to stack an extra DPS on the undead side for a 4-6 split. Typically tank, healer, dps, dps on living side and tank, healer, healer, dps, dps, dps on undead side.
Remember that you can more easily crowd control (CC) the living mobs (poly, sap, and frost nova) than you can with the undead mobs, as only non-elite undead can be shackled. You will also want to put logical classes on each side; for example retribution paladins should be on the undead side as they deal added damage and priests can shackle. Mages and rogues should be on the living side for their CC'ing abilities. Note that a good group should have no problem DPSing either side down, and so CCing often becomes ignored unless necessary for stopping trash from attacking healers. If this is your first time here, split your group like this: Undead - Best tank, best healer, best DPS. This is because the mobs are harder to pick up and harder to kill on Undead side. Also if your weaker group is on the living side, then it becomes easier for the undead side, as the mobs are coming in slower.
Since trainees and their undead equivalent are so weak (10k health), you should ignore them when worrying about slowing down DPS. Riders are especially important to fight correctly, because when they die they spawn two enemies on the other side (this second mob has 16k health and deals a significant amount of damage). Communication is vital once wave 9 hits; you should not be killing the stronger mobs on the living side if the undead side is overrun.
If anyone dies, it will probably be a wipe as DPS won't be high enough to fight off the final waves and take Gothik down far enough for the center gate to open. If the players on the undead side go down, the living side will have to take on the remaining undead mobs when the gate opens. Although you may be able to clear the undead, your DPS will probably not be strong enough to take down Gothik.
Phase 2
Gothik will teleport down to the middle of the living side, and after about 10 seconds he will teleport to the undead side. During this time, all remaining adds must be killed on both sides. Gothik will continue to go back and forth between the two sides until he reaches 30%, at which point the gate in the middle will open up. Players on the opposite side of Gothik can now join with the other group. DPS Gothik as fast as you can, as the Harvest Soul debuff will be stacking (even at 10 stacks, a full party should have no problem surviving to get him down).
The four horsemen
more coming soon
Last edited by Pinwinnie on Fri Jan 30, 2009 1:38 am; edited 7 times in total
Pinwinnie- Posts : 26
Join date : 2009-01-15
Age : 44
Location : The Netherlands
Re: Naxxramas 10 men guide
![]() Pinwinnie Sun Jan 18, 2009 6:57 pm
Pinwinnie Sun Jan 18, 2009 6:57 pm
Construct Quarter (summary of the information provided by wowwiki)
A wing of toxic slime filled with abominations and their creators. Four bosses. Also known as the Abomination Wing.
Bosses:
Patchwerk
Hateful Strike:
Patchwerk will use this ability at a 1 second frequency on the target in melee range who is second on Patchwerk's aggro list. Cannot be used on the main tank unless there are no other targets. Does 19975 to 27025 raw physical damage which can mitigated by armour and parried/dodged. This is about 7,000 damage on a partially Naxxramas geared tank. According to Elitistjerks.com this ability will add threat to the two most threatening on Patchwerk's aggro list though this is not confirmed.
Frenzy:
At 5% HP Patchwerk will gain 25% increased Physical damage (including Hateful Strike) and 40% increased melee haste.
Berserk
After 6 minutes of combat Patchwerk will go Berserk, increasing his damage by 500% and his attack speed by 50%.
Strategy
This is an extremely simple encounter that will test your gear and the sheer numbers your raid can put out. You will need one main tank and 1 Hateful strike tank.
The main tank and the hateful tank will run in first and will start taking massive damage immediately. Patchwerk will hateful strike the 2nd on his aggro list in melee range. Both tanks should be careful on the pull to establish threat immediately (otherwise, the main tank will take both melee strikes and possibly 1-2 hateful strikes), and melee dps should wait a few seconds until the two tanks are clearly established as the top two on the aggro list before beginning dps.
Once the pull has begun, Patchwerk will still melee the main tank, who will be first on aggro, and hateful the person second on threat; this makes it important establish tank aggro correctly and promptly when the fight begins). At this point it is simply a test of killing Patchwerk before his berserk timer and keeping the tanks alive. You will need 12,000 raid DPS to do this. Patchwerk also does a soft enrage (Frenzy) at 5% health, this should only last a few seconds before he goes down. Damage mitigation cooldowns (e.g., Shield Wall, Divine Protection, etc.) can be helpful to mitigate damage during the short soft enrage period. It is generally unnecessary to save dps cooldowns (e.g., Bloodlust) for the enrage period, though, as Patchwerk will normally be killed before the end of any tank cooldowns that are applied.
Grobbulus
Poison Cloud:
Grobbulus will drop these below him every ~15 seconds. They will expand over time and last 75 seconds. They deal 2,000 Nature damage per second to anyone within.
Slime Spray:
Deals 6300 to 7700 Nature damage to enemies in front of Grobbulus in a 45 yard cone. Enemies hit by Slime Spray summon a Fallout Slime.
Fallout Slime - a blob that deals 1,000 Nature damage every 2 seconds, in a 10 yard range AoE. Should be picked up by an offtank.
Mutating Injection:
Cast on a random raid member every ~20 seconds with the frequency increasing as Grobbulus' health drops. After 10 seconds, or if cleansed, the affected player will deal 8075 to 8925 Nature damage to everyone within 20 yards (including herself) as Mutagen Explosion and create a poison cloud beneath them.
Berserk
After twelve minutes of combat Grobbulus will berserker enrage. Increases all damage done by 1,000%.
Strategy
Ranged and healers should stand on the inside of the room, moving toward the outside temporarily when they are hit with the mutating injection. Melee may want to try to hit Grobbulus from the side (it will look as though they are attacking his boot) so they do not run through his poison clouds when the tank moves him. However, melee should absolutely not stand in front of Grobbulus at any point for risk of spawning an additional fallout slime.
Designate an off-tank to pick up the fallout slimes as they spawn. At least a couple ranged DPS should switch to them when they spawn so the off-tank doesn't get overwhelmed. Like the rest of the raid (with the exception of the main tank), the off-tank will occasionally be hit by mutating injections, and in these cases it may be helpful to have a hunter misdirect slimes onto him.
Towards the end of the fight, Grobbulus will be using his injection very, very frequently. Burst effects on long cooldowns (particularly Bloodlust) should be saved until late to help finish Grobbulus off. This part of the fight depends almost entirely on your ranged DPS, as melee will have great difficulty dealing any significant damage to Grobbulus due to the frequency with which they are injected.
Zombie Chow
Zombie Chows have approximately 500,000 hit points each. One will spawn every ~10 seconds from the grates near where you jump out of the pipe into Gluth's lair. These move at run speed. Vulnerable to all snares and roots.
Infected Wound:
Applied on a melee hit, increases physical damage taken by the target by 100. Stacks up to 99 times. Forces zombies to be kited rather than tanked.
When Zombie Chows are hit by Decimate they will immediately stop attacking and run towards Gluth. Should be rooted and AoE'd down. They will have approximately 25,000 hit points at this stage.
Strategy
Contrary to the tactics for 25-man, you do NOT need a paladin to help with the adds. Our guild discovered after our 2nd wipe (using a hunter for the 1st 2 tries) that our mage would be better.
Drop into the room, in order, Main Tank, Off Tank, Healer's, DPS then kiter. Let everyone but the kiter run to the door at the far end, and have the tanks pull the boss to the door.
Tanking this encounter requires switching, and if vent is not avaliable, make a macro with a Raid Warning "Tank Switch" when the stacks get too high. Our tanks (although it was our first time in naxx) were fully geared from Heroic's and emblems, so we could survive 3 stacks of the de-buff then switch - if your tanks are def capped with low avoidance, or not def capped switch more often - however if you are not def capped it is unlikely u will make it this far.
The main tank should always be tanking gluth, unless he has 3 stacks, the OT will hold aggro for 12-15seconds while the de-buff wears off the main, tank, so the tank can take over again. Positioning here dosent matter, but if your healers are inexperienced and jumpy, its a good idea to position the off tank behind gluth till he needs to taunt. this makes gluth turn around, so the healers have a visual aid for the tank switch. (the off tank will run through gluth and take the Main Tanks place) Experienced groups can just stack the tanks on top of each other.
The most difficult part of this encounter is the zombie chow, as correctly stated above, they spawn from the grates periodically. in the 10man you only need one kiter, and the most effective is a frost mage,(if they are willing, have a mage re-specc for this encounter) Keep the chow as far away from the boss as possible, to avoid devouring, and use all slow/stun moves to aid the kiter.
WARNING! DO NOT ATTEMPT TO KILL THE CHOW. Even on normal, they have 500k health and there is usually 5-10 up at a time, and if a raid can do that much aoe damage they shouldn't be focusing on the chow .
.
After decimate have your mage use whatever shield he/she has access to and use frost nova, the rest of the dps shoul then run in and Aoe the chow. In the case of starter raids (slightly undergeared) divert all DPS onto the chow, leaving just the tank and Off tank on the boss. We found using 2Death knights and a hunter was sufficient to kill the chows before the frost nova broke.
Tips for kiting : -If an add goes stray from the pack the mage is kiting, done just let it run, have a hunter/paladin/lock pick it up (use what ever slowing abilities you have) - If the paladin is OT, do not have him help with the adds (we made a simular mistake and he was out of range to taunt the boss from our warrior when he had reached two stacks) - If your dps is lower than average (you beat patchwerk so it cant have been too bad ) use everyone to take down the adds after decimate. - If you have 3 healers, pick the "worst" one and have them dedicated to keeping the mage up. This works well, if you have the boss on farm and are gearing up your "2nd team". 2 healers is more than enough to keep the tank alive. - If you have a druid be sure to watch the mages mana and innervate (there is likely to be no time for the mage to evocate during this fight as he/ she will be occupied for the duration. - Do NOT Attempt to tank the adds! - they stack a de-buff increasing damage done by 100 per stack. if you have 5 chow on ur tank, after 5 hits your tank will be taking 500 more damage and after 10 seconds, roughly 500 more.
One of the hardest things for new groups is actually beating gluths enrage timer, once the mage has got the kiting perfected, you need to focus on maxing dps. Soft cooldowns (anything which resets in 3mins or less) should be used on entry, with heavy cools like bloodlust, being saved.
There seems to be a fault with the Deadly boss mod enrage timer, where enrage does not happen till 32seconds after the mod declares it. so ignore it.
With your mage busy with the adds and your hunter/ ranged dps switching back and forth, you are heavily reliant on good melee dps to bring down gluth. shaman totems to enhance melee damage, warrior shouts/ paladin blessings and death knights "horn of winter" should be kept up at all times, Gulth has approximatly 3million health (assuming that your kiter lets a few chow through) so your dps needs to max out damage as often as possible.
After the 3rd decimate, roughly 4-5mins in, you need to hit all your Cool's, soft cools wil have refreshed, and big cools like bloodlust should be hit. gluth should be on approximatly 25-35% health, if he isn't chances are you will not beat the enrage timer. (well established groups may well have downed gluth by this point so ignore this)
This is the point where you burn your mana, healers should be running low, so top off the tank and use whatever youve got to do some extra boss damage, before using your "shadowfiend" type move. if gluth does not die before the next decimate, you will inevitably wipe at the decimate, because the chow will be piling up and your mage will be oom. have your dedicated healer leave the mage and apply some last min DPS on the boss. If he is below 5% at the next decimate, leave the adds alone, focus your fire and kill the boss, slowing not slaying the adds.
-Classes you shouldn't go without- A Mage - simply for kiting Paladin - prot/ret - the extra damage pala's can do against undead is a real boost here, our off tank came 3rd in DPS because of the UD slaying moves. Druid - innervate on the mage is useful, if not lots of potions. Works as well with our very own enhancement shammy Ele
Thaddius
 1-shotted, no tactics needed
A wing of toxic slime filled with abominations and their creators. Four bosses. Also known as the Abomination Wing.
Bosses:
- Patchwerk: A titanic standard Abomination.
- Grobbulus: A slime based Abomination.
- Gluth: An Abomination-Dog created from animal parts.
- Thaddius: A massive abomination with electricity based powers.
Patchwerk
- Patchwerk has approximately 4,320,000 hit points. His regular melee hits plate for about 4,500.
Hateful Strike:
Patchwerk will use this ability at a 1 second frequency on the target in melee range who is second on Patchwerk's aggro list. Cannot be used on the main tank unless there are no other targets. Does 19975 to 27025 raw physical damage which can mitigated by armour and parried/dodged. This is about 7,000 damage on a partially Naxxramas geared tank. According to Elitistjerks.com this ability will add threat to the two most threatening on Patchwerk's aggro list though this is not confirmed.
Frenzy:
At 5% HP Patchwerk will gain 25% increased Physical damage (including Hateful Strike) and 40% increased melee haste.
Berserk
After 6 minutes of combat Patchwerk will go Berserk, increasing his damage by 500% and his attack speed by 50%.
Strategy
This is an extremely simple encounter that will test your gear and the sheer numbers your raid can put out. You will need one main tank and 1 Hateful strike tank.
The main tank and the hateful tank will run in first and will start taking massive damage immediately. Patchwerk will hateful strike the 2nd on his aggro list in melee range. Both tanks should be careful on the pull to establish threat immediately (otherwise, the main tank will take both melee strikes and possibly 1-2 hateful strikes), and melee dps should wait a few seconds until the two tanks are clearly established as the top two on the aggro list before beginning dps.
Once the pull has begun, Patchwerk will still melee the main tank, who will be first on aggro, and hateful the person second on threat; this makes it important establish tank aggro correctly and promptly when the fight begins). At this point it is simply a test of killing Patchwerk before his berserk timer and keeping the tanks alive. You will need 12,000 raid DPS to do this. Patchwerk also does a soft enrage (Frenzy) at 5% health, this should only last a few seconds before he goes down. Damage mitigation cooldowns (e.g., Shield Wall, Divine Protection, etc.) can be helpful to mitigate damage during the short soft enrage period. It is generally unnecessary to save dps cooldowns (e.g., Bloodlust) for the enrage period, though, as Patchwerk will normally be killed before the end of any tank cooldowns that are applied.
Grobbulus
- Grobbulus has approximately 2,928,000 hit points.
Poison Cloud:
Grobbulus will drop these below him every ~15 seconds. They will expand over time and last 75 seconds. They deal 2,000 Nature damage per second to anyone within.
Slime Spray:
Deals 6300 to 7700 Nature damage to enemies in front of Grobbulus in a 45 yard cone. Enemies hit by Slime Spray summon a Fallout Slime.
Fallout Slime - a blob that deals 1,000 Nature damage every 2 seconds, in a 10 yard range AoE. Should be picked up by an offtank.
Mutating Injection:
Cast on a random raid member every ~20 seconds with the frequency increasing as Grobbulus' health drops. After 10 seconds, or if cleansed, the affected player will deal 8075 to 8925 Nature damage to everyone within 20 yards (including herself) as Mutagen Explosion and create a poison cloud beneath them.
Berserk
After twelve minutes of combat Grobbulus will berserker enrage. Increases all damage done by 1,000%.
Strategy
Ranged and healers should stand on the inside of the room, moving toward the outside temporarily when they are hit with the mutating injection. Melee may want to try to hit Grobbulus from the side (it will look as though they are attacking his boot) so they do not run through his poison clouds when the tank moves him. However, melee should absolutely not stand in front of Grobbulus at any point for risk of spawning an additional fallout slime.
Designate an off-tank to pick up the fallout slimes as they spawn. At least a couple ranged DPS should switch to them when they spawn so the off-tank doesn't get overwhelmed. Like the rest of the raid (with the exception of the main tank), the off-tank will occasionally be hit by mutating injections, and in these cases it may be helpful to have a hunter misdirect slimes onto him.
Towards the end of the fight, Grobbulus will be using his injection very, very frequently. Burst effects on long cooldowns (particularly Bloodlust) should be saved until late to help finish Grobbulus off. This part of the fight depends almost entirely on your ranged DPS, as melee will have great difficulty dealing any significant damage to Grobbulus due to the frequency with which they are injected.
Gluth
Mortal Wound: Inflicts 150% weapon damage and reduces healing received by 10% for 15 seconds, stacking up to 10 times. Enrage: Increases melee haste by 25% and damage by 25% for 8 seconds. Dispellable by Rogues and Hunters. Decimate Reduce the current health of all nearby units (friendly or enemy) to 5% of their maximum health. Affects both players and zombies. Used approximately every 2 minutes. Also may hit the tank for 75% of his life if not evaded. Devour Zombie Gluth will emote, "Gluth spots a nearby Zombie to devour!" and move towards any zombies that get near him. This will heal him by 5% of maximum HP. Berserk Gluth will berserk roughly 8 minutes after being engaged. Increases damage done by 500% and melee haste by 150%. This will be a bit after the fourth use of Decimate. |  |
Zombie Chow
Zombie Chows have approximately 500,000 hit points each. One will spawn every ~10 seconds from the grates near where you jump out of the pipe into Gluth's lair. These move at run speed. Vulnerable to all snares and roots.
Infected Wound:
Applied on a melee hit, increases physical damage taken by the target by 100. Stacks up to 99 times. Forces zombies to be kited rather than tanked.
When Zombie Chows are hit by Decimate they will immediately stop attacking and run towards Gluth. Should be rooted and AoE'd down. They will have approximately 25,000 hit points at this stage.
Strategy
Contrary to the tactics for 25-man, you do NOT need a paladin to help with the adds. Our guild discovered after our 2nd wipe (using a hunter for the 1st 2 tries) that our mage would be better.
Drop into the room, in order, Main Tank, Off Tank, Healer's, DPS then kiter. Let everyone but the kiter run to the door at the far end, and have the tanks pull the boss to the door.
Tanking this encounter requires switching, and if vent is not avaliable, make a macro with a Raid Warning "Tank Switch" when the stacks get too high. Our tanks (although it was our first time in naxx) were fully geared from Heroic's and emblems, so we could survive 3 stacks of the de-buff then switch - if your tanks are def capped with low avoidance, or not def capped switch more often - however if you are not def capped it is unlikely u will make it this far.
The main tank should always be tanking gluth, unless he has 3 stacks, the OT will hold aggro for 12-15seconds while the de-buff wears off the main, tank, so the tank can take over again. Positioning here dosent matter, but if your healers are inexperienced and jumpy, its a good idea to position the off tank behind gluth till he needs to taunt. this makes gluth turn around, so the healers have a visual aid for the tank switch. (the off tank will run through gluth and take the Main Tanks place) Experienced groups can just stack the tanks on top of each other.
The most difficult part of this encounter is the zombie chow, as correctly stated above, they spawn from the grates periodically. in the 10man you only need one kiter, and the most effective is a frost mage,(if they are willing, have a mage re-specc for this encounter) Keep the chow as far away from the boss as possible, to avoid devouring, and use all slow/stun moves to aid the kiter.
WARNING! DO NOT ATTEMPT TO KILL THE CHOW. Even on normal, they have 500k health and there is usually 5-10 up at a time, and if a raid can do that much aoe damage they shouldn't be focusing on the chow
After decimate have your mage use whatever shield he/she has access to and use frost nova, the rest of the dps shoul then run in and Aoe the chow. In the case of starter raids (slightly undergeared) divert all DPS onto the chow, leaving just the tank and Off tank on the boss. We found using 2Death knights and a hunter was sufficient to kill the chows before the frost nova broke.
Tips for kiting : -If an add goes stray from the pack the mage is kiting, done just let it run, have a hunter/paladin/lock pick it up (use what ever slowing abilities you have) - If the paladin is OT, do not have him help with the adds (we made a simular mistake and he was out of range to taunt the boss from our warrior when he had reached two stacks) - If your dps is lower than average (you beat patchwerk so it cant have been too bad
One of the hardest things for new groups is actually beating gluths enrage timer, once the mage has got the kiting perfected, you need to focus on maxing dps. Soft cooldowns (anything which resets in 3mins or less) should be used on entry, with heavy cools like bloodlust, being saved.
There seems to be a fault with the Deadly boss mod enrage timer, where enrage does not happen till 32seconds after the mod declares it. so ignore it.
With your mage busy with the adds and your hunter/ ranged dps switching back and forth, you are heavily reliant on good melee dps to bring down gluth. shaman totems to enhance melee damage, warrior shouts/ paladin blessings and death knights "horn of winter" should be kept up at all times, Gulth has approximatly 3million health (assuming that your kiter lets a few chow through) so your dps needs to max out damage as often as possible.
After the 3rd decimate, roughly 4-5mins in, you need to hit all your Cool's, soft cools wil have refreshed, and big cools like bloodlust should be hit. gluth should be on approximatly 25-35% health, if he isn't chances are you will not beat the enrage timer. (well established groups may well have downed gluth by this point so ignore this)
This is the point where you burn your mana, healers should be running low, so top off the tank and use whatever youve got to do some extra boss damage, before using your "shadowfiend" type move. if gluth does not die before the next decimate, you will inevitably wipe at the decimate, because the chow will be piling up and your mage will be oom. have your dedicated healer leave the mage and apply some last min DPS on the boss. If he is below 5% at the next decimate, leave the adds alone, focus your fire and kill the boss, slowing not slaying the adds.
-Classes you shouldn't go without- A Mage - simply for kiting Paladin - prot/ret - the extra damage pala's can do against undead is a real boost here, our off tank came 3rd in DPS because of the UD slaying moves. Druid - innervate on the mage is useful, if not lots of potions. Works as well with our very own enhancement shammy Ele
Thaddius
1-shotted, no tactics needed Last edited by Pinwinnie on Tue Jan 27, 2009 10:41 pm; edited 7 times in total
Pinwinnie- Posts : 26
Join date : 2009-01-15
Age : 44
Location : The Netherlands
Pinwinnie- Posts : 26
Join date : 2009-01-15
Age : 44
Location : The Netherlands
» Naxxramas 04/02/2009
» Loot table for Naxxramas raid 11/02/2009
» Loot table for Naxxramas raid 19/02/2009
» Obsidian Sanctum guide
» Loot table for Naxxramas raid 11/02/2009
» Loot table for Naxxramas raid 19/02/2009
» Obsidian Sanctum guide
Page 1 of 1
Permissions in this forum:
You cannot reply to topics in this forum|
|
|